Popup / Lightweight template

Cxense is proud to welcome publishers and media companies in Japan, to a seminar at the Royal Norwegian Embassy in Tokyo on May 28th.
As the first Cxense Japan event in 2013 was a great success and attended by over 80 publishers and media contacts, we have decided to host another event this year.
The seminar will provide Cxense customers and contacts in the Japanese publishing world with valuable industry updates, and serve as a networking forum for media companies.
The seminar will feature two Cxense case studies with esteemed guest speakers from DMM.com Lab and MediaGene, as well as an industry update from Cxense's founder Dr. John M. Lervik, and an update and demo of the newly launched Cxense DMP solution by its Product Manager, Mr. Jan Helge Sageflaat coming in from Oslo, Norway, for the event.
As the first Cxense Japan event in 2013 was a great success and attended by over 80 publishers and media contacts, we have decided to host another event this year.
The seminar will provide Cxense customers and contacts in the Japanese publishing world with valuable industry updates, and serve as a networking forum for media companies.
Procedure - Template
- Piano Activation にログインする
- 「管理」メニュー → 「テンプレート」でテンプレート画面に遷移
- 左上のセレクタで、「Lightweight templates」を選択する
- 右上の「テンプレート追加」をクリック
- 任意のテンプレートタイトルを入力し、USE CASE を「Lightweight adblock」に設定し「ライブラリに追加」をクリックする
- 作成したテンプレートを開き、「</> (コードを編集)」をクリックする
- 以下の Template HTML、Template CSS、Template JAVASCRIPT のコードをコピーしてペーストする
- 同様にコンテンツフィールドの入力項目設定を以下の Template Content Fields の例を参考に作成し、到達 URL や画像 URL などの値はカスタマイズする
- 「保存」をクリックする
Template HTML/JSX
<div id="pianoj-popup" class="pianoj-popup"> <div class="pianoj-popup-close" onClick={e => context.close()}> <svg viewBox="0 0 24 24" style="fill:[%% close_button_color %%];"> <path d="M19 6.41l-1.41-1.41-5.59 5.59-5.59-5.59-1.41 1.41 5.59 5.59-5.59 5.59 1.41 1.41 5.59-5.59 5.59 5.59 1.41-1.41-5.59-5.59z"></path> <path d="M0 0h24v24h-24z" fill="none"></path> </svg> </div> <div class="pianoj-popup-inner"> <img class="pianoj-popup-image" src="[%% image_url %%]" onLoad={imgLoaded()}/> <div class="pianoj-popup-text-wrap" style="background-color:[%% text_background_color %%];"> <div class="pianoj-popup-text-inner"> <div class="pianoj-popup-subtitle" style="color:[%% text_color %%];">[%% subtitle %%]</div> <div class="pianoj-popup-title" style="color:[%% text_color %%];">[%% title %%]</div> </div> </div> <A class="pianoj-popup-link" href="[%% click_url %%]" target="_blank" externalEventName="banner_click"></A> </div></div>Template CSS
#pianoj-popup { position: relative; z-index: 99997;}#pianoj-popup * { text-decoration: none;}.pianoj-popup-text-inner { padding: 0.6em;}.pianoj-popup-subtitle { padding-bottom: 0.6rem; text-decoration: underline !important; font-size: 0.8em;}.pianoj-popup-title { font-size: 1em; line-height: 1.2rem;}.pianoj-popup-link { position: absolute; top: 0px; right: 0px; width: 100%; height: 100%; cursor: pointer; z-index: 99998;}.pianoj-popup-close { position: absolute; top: 0px; right: 0px; padding: 0.4rem; transition: all 0.5s cubic-bezier(0.23, 1, 0.32, 1); cursor: pointer; z-index: 99999;}.pianoj-popup-close:hover { transform: scale(1.4,1.4);}.pianoj-popup-close svg{ width: 2.5em; pointer-events: none; vertical-align: top;}Template JAVASCRIPT
// 既存のコードを以下に置き換えるconst el = document.querySelector('.piano-modal-wrapper');el.style.opacity = "0"// 画像の読み込みをもとにアニメーションを開始していますが、画像がない場合には// tp.push(["addHandler","showTemplate",()=>{}]);等で代用可能ですconst imgLoaded = () => { requestAnimationFrame(() => { const originalPosition = window.getComputedStyle(el).transform; el.style["box-shadow"] = "4px 4px 20px 5px rgba(0,0,0,0.4)"; el.style.overflow = "hidden"; el.style.transform = `${originalPosition} translateY(150%)`; //初期位置 requestAnimationFrame(() => { el.style.opacity = "1" el.style.transition = 'transform 1s ease-in-out'; el.style.transform = originalPosition; }); });};----- テンプレートの出現方向を変える場合 -----右から el.style.transform = `${originalPosition} translateX(150%)`; //初期位置左から el.style.transform = `${originalPosition} translateX(-150%)`; //初期位置下から el.style.transform = `${originalPosition} translateY(150%)`; //初期位置Template Content Fields
| コンテンツフィールド | 値(サンプル) | | --- | --- | | click_url | 任意のURL | | image_url | 画像のURL | | subtitle | サブタイトル文字列 | | title | タイトル文字列 | | close_button_color | 閉じるボタンの色 | | text_color | テキストの色 | | text_background_color | テキスト背景の色 |
Procedure - Experience
- Piano Activation にログインする
- 「プロダクト」メニュー → 「Composer」をクリック
- 右上の「作成」をクリック
- 「サイト用エクスペリエンス」を選択
- 任意の名称を設定し、右上の「作成」をクリック
- 任意の対象ページ、ユーザーセグメント、イベントを定義する
- アクションの「テンプレートを表示」カードを任意の条件の場所にドラッグ&ドロップする
- カードのプロパティを以下のように設定する
- テンプレート:先ほど作成したテンプレートを指定
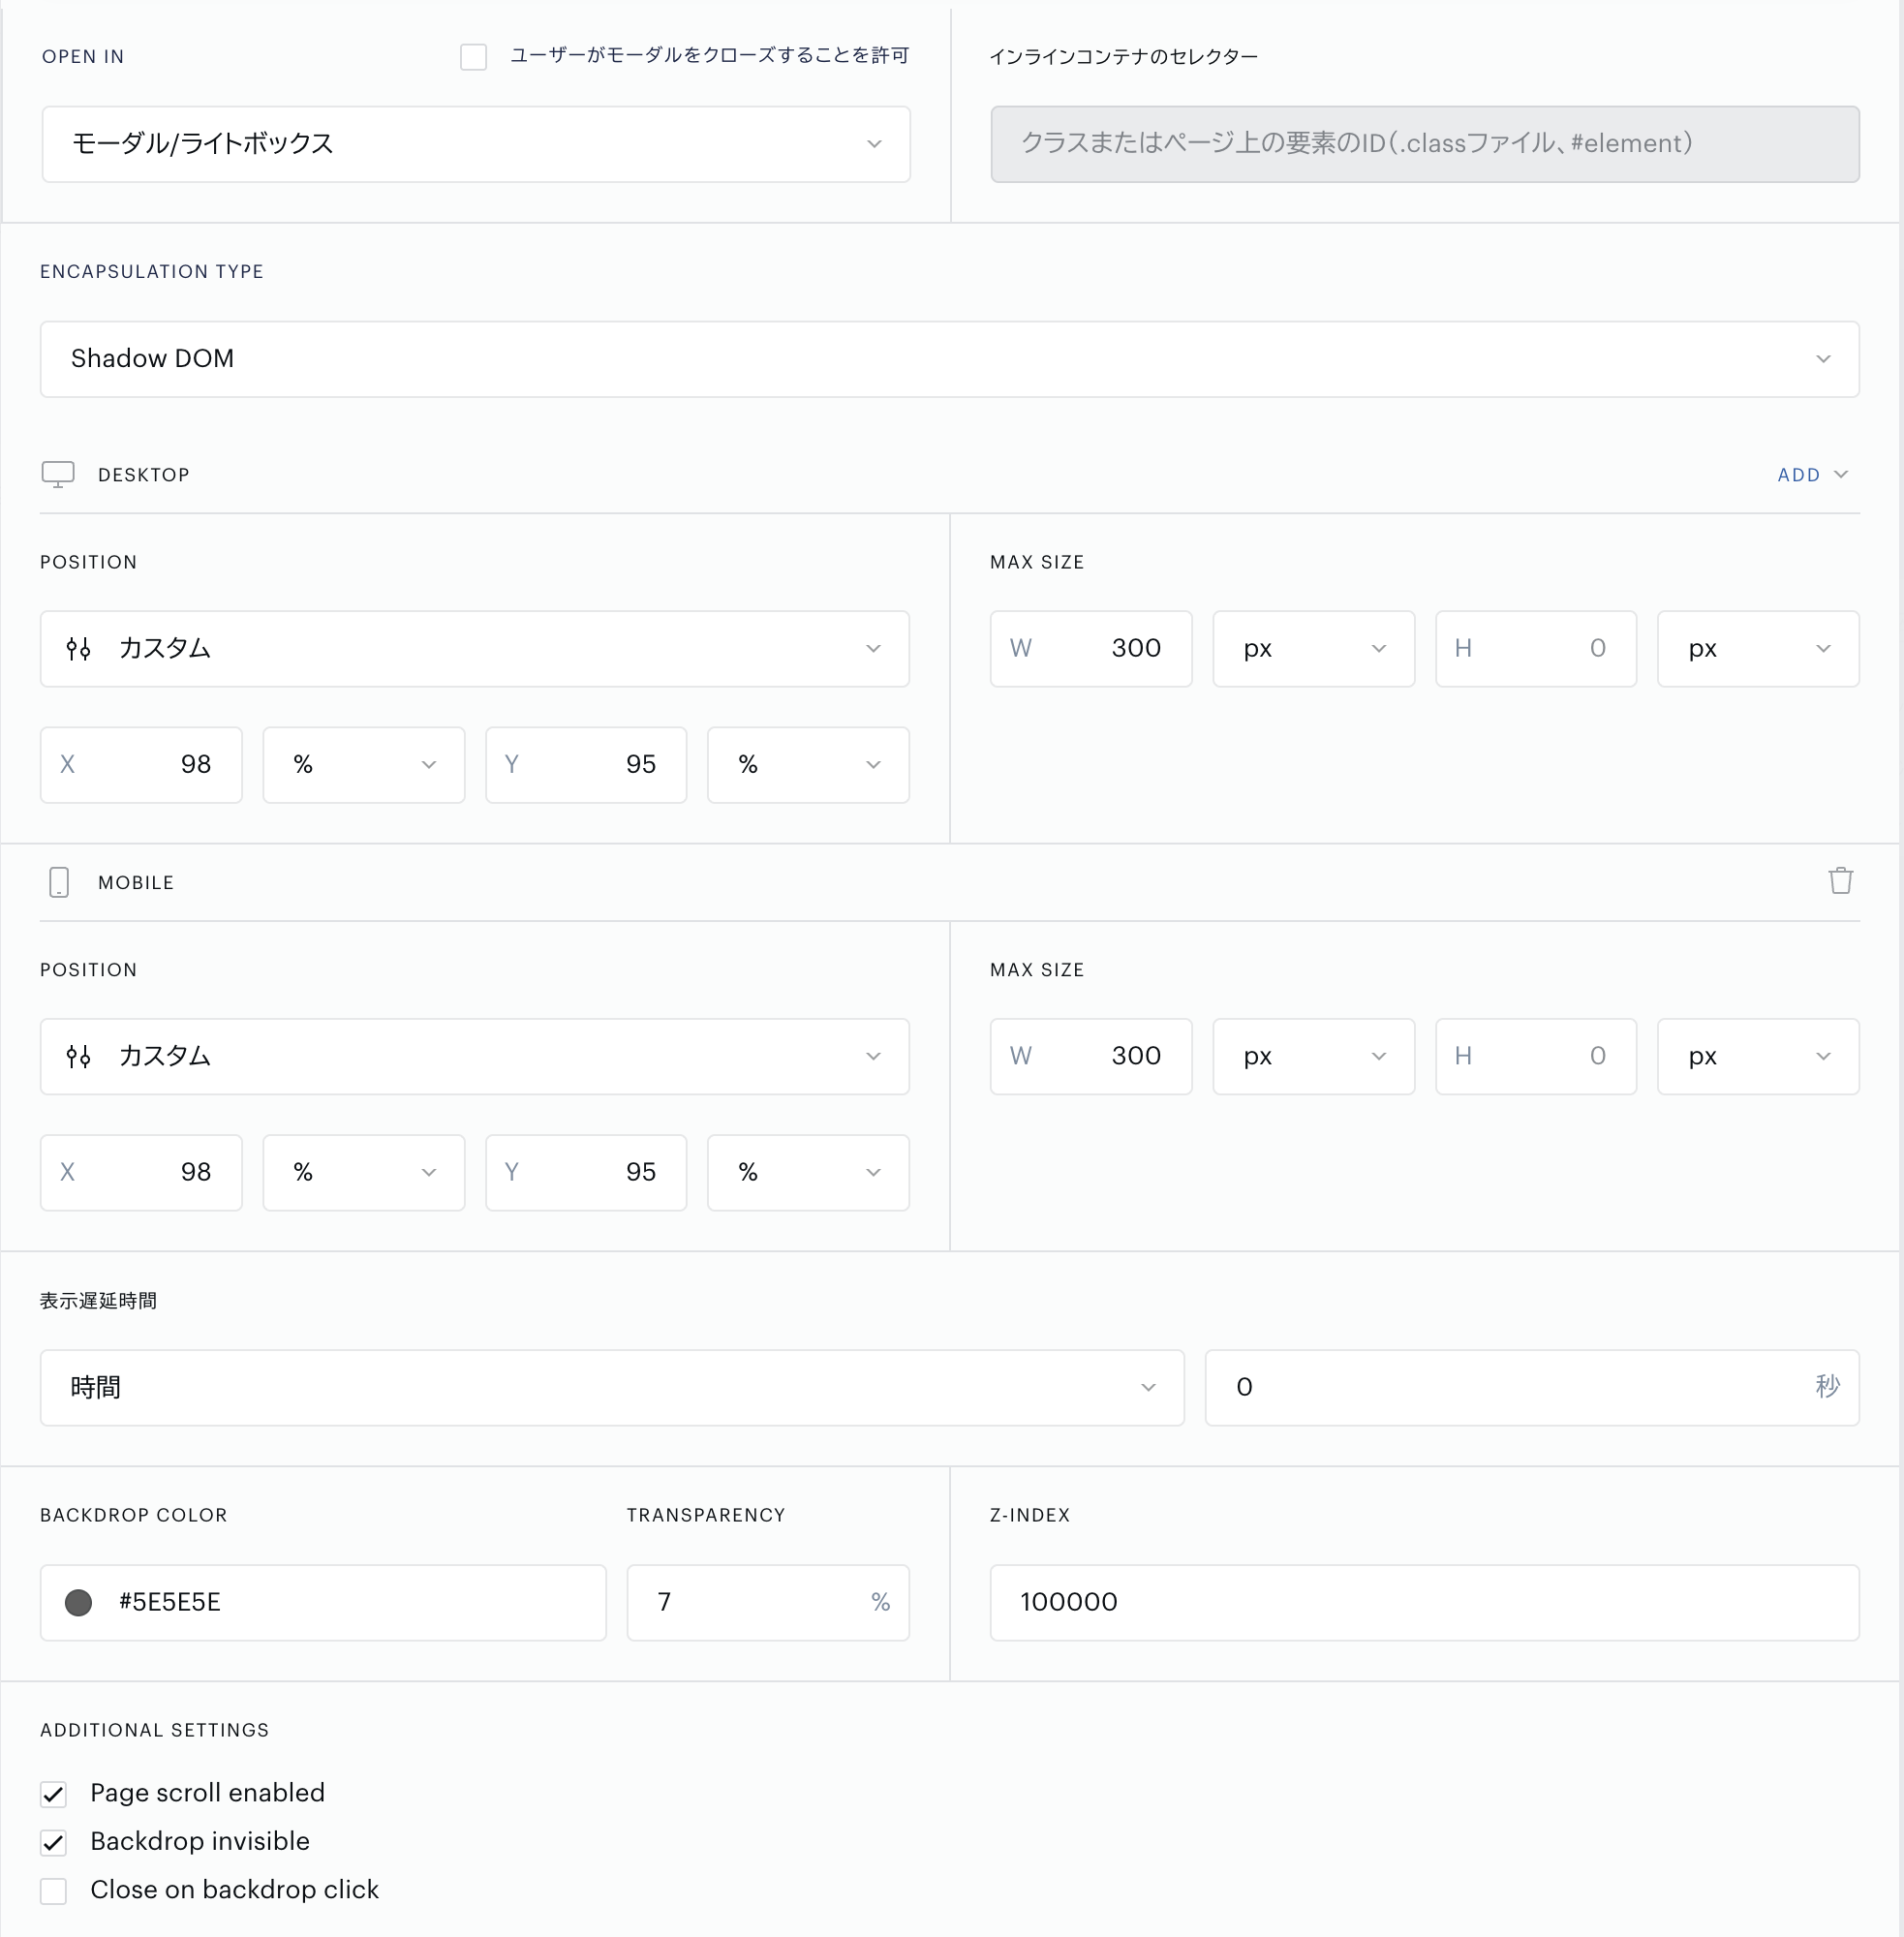
- OPEN IN:モーダル/ライトボックス
- ユーザーがモーダルをクローズすることを許可:× ボタンは独自実装しているため、OFF にする
- ENCUPSULATION TYPE: Shadow DOM
- DESKTOP: ※必ず右の ADD ボタンから Mobile を追加して同じ設定をしてください。MAX_SIZE に関しては違う値を設定しても構いません
- POSITION: カスタムを選択し、X と Y を % で設定する。例) X 98%、Y 95% → 右下
- MAX SIZE: テンプレートの表示サイズを定義する。例) X 300px、Y 設定なし
- ADDITIONAL SETTINGS:
- Page scroll enabled: ☑️
- Backdrop invisible: ☑️
- キャンバス編集画面に戻り、保存をした後に「有効」をクリックしてバージョンをデプロイする
- Composer 画面に戻り、作成したエクスペリエンスを「ライブ」に設定する